I recently posted this picture, of my two children Olivia and Jonathan, on FaceBook. I received some questions about the 'wine bottle drape', on the table.
I said I would share how I make these drapes. This is a good a venue as any. However, since it is not 'Bead Looming' related, I want to sneak this in quietly.
Using simple supplies: any type of stone or gem, eye pins and jump rings. I purchase the eye pins (a pin with one end already bent over in an eye round) and jump rings (10mm in size). I prefer to use any type of metal, but not silver. This fact makes this project very inexpensive. Refer to the photo below, as I explain the start of this drape.
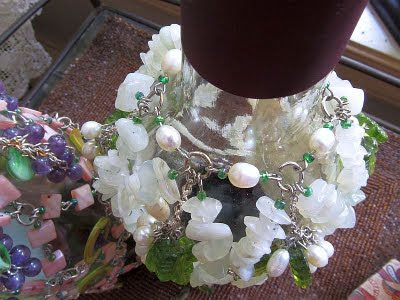
I prewrap each spacer, using the prewrapped eye pin. Load the eye pin with the type of stone or gem you are using, then cut to size so the stone fits snug, and fold over the other end into an 'eye', like the purchased pin already has. Sometimes, I'll make a load of these first, then begin the build, or you can wrap and make these as you build. The starting loop, which fits over the neck of the bottle, is make using size jump rings. You can see the 'start loop' in the picture above.
The full view below will show how you are working from these first six jump rings. If you have the eye pins loaded with your stone and wrapped first, you can add 'four' on to the jump ring, when making the 'start loop'. That way you don't have to open the jump ring to add the next layer. What you are creating is a diamond shaped pattern, adding jump rings and eye pin spacers, as you go further down the bottle.
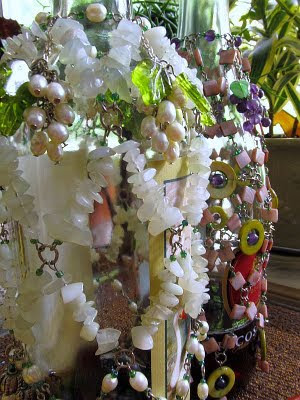
After I finished the netting to cover the entire bottle, at the length I wanted to complete, then I made the 'clusters' of purple stones, hanging on a piece of chain, to create the look of grapes. I added this in between the upper sections of diamond shapes.

The bottle on the left shows I added another 'cross stretcher' of a different bead, between the large diamond pattern around the middle of the bottle. You can add or do anything, once you have the base netting completed.
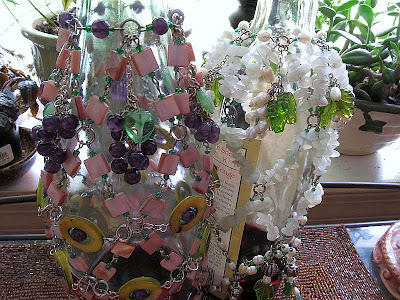
The start loop, which sits around the neck of the bottle, is using either one large stone or gem to create then the diamond pattern covering the rest of the bottle is made using longer stretches of stones on the eye pins.
There are smaller and larger size wine bottles, so you may need to make one for each size. Again, use inexpensive supplies to make these. I did because I prefer the look of oxidation to the metal after many years of use!
I won't be discussing the beaded mat you may see the bottles sitting on...back to looming now!